The year 6 Fleetville Code Club has kept going during all through lockdown – we spent a lot of time in Minecraft, which worked pretty well for virtual sessions, since we were all sharing the same virtual space.
This term we did something a bit different: the students have been making and programming MINI•MU musical gloves. This is a kit designed by Helen Leigh based on the MiMU Glove – in turn invented by the musician Imogen Heap and her team. You can get a glimpse of what the full MiMU Gloves can do in the following video:
The MINI•MU Gloves are considerably simpler than the ones in the video – instead of picking up all finger and hand movements, they use the movement sensors on a BBC micro:bit to detect basic hand motions, like how much you tilt your hand front to back and side to side. It’s still plenty of input to use for a musical instrument though!
We received the glove kits thanks to the OpenUK Digital Kids Camp and Huawei – who sent out 3000 kits and provided some cool e-zines which we used as a basis for our sessions. The students had to first cut the pattern from felt and sew their glove together, then connect the micro:bit, sound board and battery pack – before programming the micro:bit to make their own sounds.
This was a harder project to get to work in an all-remote environment, and I think some of the students found it hard to stay engaged without being able to share their creations in real life. Even so, I was really impressed with what they managed to build. Here’s my favourite wishing one of the student’s grandparents a happy birthday!
The MINI•MU gloves make it easy to make a sound as they have a built-in speaker. However, the micro:bit can only make very simple beeps by itself.
I spent a bit of time trying to get closer to the full MiMU glove experience by sending the movement of the glove to something else that could make some richer sounds.
Scratch
One option is to connect the micro:bit to Scratch using its bluetooth connection. The Scratch site has very clear instructions on how to get the micro:bit connected – you need to install the Scratch Link software on macOS or Windows, or else use the Scratch app for ChromeOS or Android tablets; then install a special program on the micro:bit itself; and finally add the micro:bit extensions to Scratch and identify your micro:bit by the name it displays.
I’ve made another example that lets you make noises as you move either the mouse or the micro:bit around. You can have a go below:
Bluetooth MIDI
Another way to get better sound from the MINI•MU glove is to connect the micro:bit to a tablet or computer using MIDI over Bluetooth. MIDI is a music communication system that’s even older than the micro:bit’s BBC precursor from 1981, the venerable BBC Micro. You can use MIDI to describe starting and stopping a particular note, how hard the note is played (its velocity) and all sorts of other variations – and the system is supported by most music making programs, including things like GarageBand.
To get MIDI from your micro:bit to your computer or tablet is a little complex but once it’s working, you can make all kinds of sounds! Here’s some tips and tricks to get you going:
Build a project with the Bluetooth MIDI extension
To send Bluetooth MIDI from your micro:bit, you’ll need to add the Bluetooth MIDI extension:
In MakeCode, click Advanced at the bottom of the blocks
Scroll down to the bottom to see Extensions
Click that and type “midi” into the search bar
Make sure you click on the bluetooth-midi extension, not the plain midi one
You’ll now have some extra light blue blocks in the Midi category
Tilt your micro:bit left and right to choose a note, then press the A button to make the micro:bit send the current note. There’s a secret feature to use the light levels picked up from the LEDs – can you figure out how to use it?
Make your micro:bit easier to connect
micro:bit MakeCode projects have a secret option that makes it easier to connect the micro:bit to something over bluetooth. It would probably make things harder if you had lots of devices in a classroom, but if you’re just wanting to connect a single micro:bit to your computer or tablet then this will make your life much easier!
Go to project settings by clicking on the gearwheel at the top right of the page
Turn on “No Pairing Required: Anyone can connect via Bluetooth”
Click Save
Re-download your project to the micro:bit
The Pentatonic MIDI Controller project above already has this option set for you!
micro:bit to iPad
This is fairly simple – in GarageBand for the iPad, go to Settings (the gearwheel icon), click Advanced, click Bluetooth MIDI Devices, tap the micro:bit then tap the Connect switch on. If the micro:bit is marked as offline, click Edit and Forget the device.
Now you can use your micro:bit to play and record tunes in GarageBand – and choose any instrument you want!
micro:bit to Mac
macOS won’t connect to the micro:bit by itself and needs a little bit of prompting. Download and run the Bluetility app to see the micro:bit, then click the last service and the last characteristic (they should start “E95D93AF-” and “E95DB84C-” respectively). You should then see a Subscribe button to click in the Detail pane – and this should then make the micro:bit appear in your Bluetooth system preferences.
Now that the micro:bit is connected over Bluetooth, you need to tell the macOS MIDI system that it needs to listen to it. Open the Audio MIDI Setup app (it lives in /Applications/Utilities – or just use Spotlight Search). Make sure the MIDI Studio window is showing (if not, go to the Window menu and choose Show MIDI Studio). Then click the Bluetooth symbol in the MIDI Studio window’s toolbar, which should open the Bluetooth Configuration window and list your connected micro:bit. Click the Connect button next to your micro:bit and you’re finally ready to play!
Open GarageBand, create a new project, and add a Software Instrument. GarageBand should pick up the connected micro:bit immediately and play the notes that you send. You can then choose different sounds from the Library to make your micro:bit play whatever instruments you want.
As well as the movement sensors, the micro:bit also has edge connectors that you can use to attach all sorts of other technology. The MINI•MU glove uses these to connect the speaker, but if you’re going to use bluetooth to output the sound, then you can use the connectors to get more input.
Here’s the micro:bit wizard David Whale with his micro:bit guitar:
And if you really want to see how far you can go, how about using muscle movements to control your music? Here’s a video on how to pick up electrical changes from your muscles using a micro:bit:
I’ve been running a Code Club at Fleetville Junior School in St Albans for the past four years and we have a whole load of fun programming and making things with computers.
About a year and a half ago, I introduced some Minecraft challenges to the club and soon discovered that it was the genie that can’t be put back into the bottle…
But what a genie! The students have been programming virtual turtles to build and dig their way through challenges, culminating in designing and building huge bridges across an endless ocean (seetheirvideos). They can’t get enough of being in Minecraft — even if they’re not allowed to kill each other or blow things up!
For the follow-on project from the bridge building, I wanted to give the students the chance to create something without programming — so I asked them to build a model of their school in Minecraft. They loved the idea!
I wanted the students to build the model themselves, but they needed a guide to help them get things to scale. I figured that a flat map of the school buildings sitting in the Minecraft world would be a good place to start.
Google Maps has a good detailed view of the outside of the school, but this wouldn’t help with the interior rooms. Luckily the school had a PDF architectural plan of the school that they were happy to contribute.
I took a screenshot of the Google Earth aerial imagery of the school and its grounds and then combined the image with the architectural plan in a drawing program.
The next step was to convert the image into a Minecraft “schematic” file — this is a file that can be imported into a world using the WorldEdit mod.
There’s a great little program called Spritecraft that does exactly this job. You’ll need the (paid for) Full version of Spritecraft to export as a schematic, but all the money goes to a children’s charity.
It took me a little while to adjust the image to give a good output in Spritecraft. First of all, I had to adjust the architectural plan to make it a bit more chunky — those fine lines just didn’t make it into the block-based world of Minecraft. Filling in the walls and removing the door symbols helped a lot, as did setting the windows to a contrasting colour (don’t forget that some students might be colour blind).
Secondly I had to choose a scale… I measured the outside of the school using Google Maps (right-click on a starting point and choose “Measure Distance” then left-click on the end point) and compared this to the number of pixels across the school in the image. Although Minecraft is all set up to use one block to one metre, using this default scale made the school corridors too narrow at just one block wide!
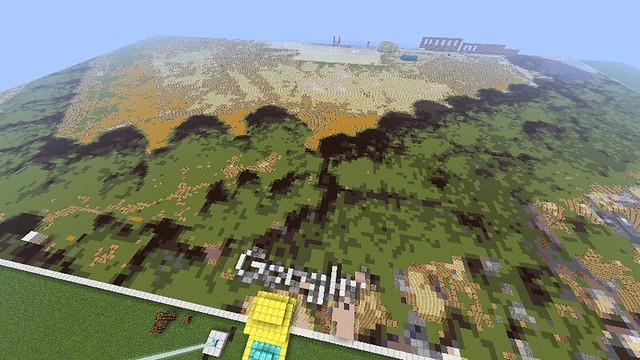
For my build, a scale of 1.5 blocks to 1 metre seemed to work better — the corridors were a couple of blocks wide and the building didn’t seem too large. This might be different for your build — so play around and see what works for you. Here's the result:
Finally, I exported the schematic file from Spritecraft and copied it into the correct server directory (for MinecraftEdu that’s server/schematics but it may be different for your server). Then in a flat Minecraft world, I used the WorldEdit //schematic load <filename> and //paste commands to make the plan appear on the ground.
For our school there was an extra complication — the whole school is built on a slope, with steps and ramps along the corridors. To ensure the floor level ended up in the right place, I asked the students to start building at the lowest point of the school and then create the corridors (with their slopes and steps) before creating the classrooms.
This has been a really successful project so far. The students have made some really detailed rooms, complete with furniture, automated lighting systems(!) and non-player characters acting as teachers.
Here’s some pictures of their build so far — I hope to make another video before the end of term of the students giving a guided tour…
If this has helped you and you’ve created something from the real world in Minecraft (especially another school), please comment below — I’d love to hear from you!
I make things for mobile, web, voice and LEGO; create all sorts of stuff at Tesco Labs using agile development in any language that fits; run a CodeClub for kids in St Albans.
I blog about mobile stuff, Mac stuff (especially Time Machine), agile stuff and the events I attend.
I post at @adamcohenrose@mastodon.social — follow me!